Measuring Elevated Body Temperature ( ශරීර උෂ්ණත්වය මැනීම)

Product selection guide:Screening for Elevated Body Temperature

Questions? Call +94 76 779 5079 or 076 325 8131 (WhatsApp only).

COVID-19/Coronavirus අඛණ්ඩව වර්ධනය වෙත්ම, නිෂ්පාදන භාවිතය පිළිබඳ ව්‍යාකූලතා ඉවත් කිරීමට හා ඔබ නිවැරදි විසඳුම සොයා ගන්නා බවට සහතික වීමට අපට අවශ්‍යය. අප ව්යාපාරය විවිධාකාර තාප නිරූපණ සහ අධෝරක්ත උෂ්ණත්වමාන ( thermal imagers and infrared thermometers) අලෙවි කරයි , ඒවා සියල්ලම ඉහළ ශරීර උෂ්ණත්වය හඳුනා ගැනීම සඳහා භාවිතයට සුදුසු නොවේ. මෙම මාර්ගෝපදේශය මඟින් මිල ගණන් සහ ක්‍රියාකාරීත්වයේ මට්ටම් ආවරණය කරමින් භාවිතා කළ හැකි නිෂ්පාදන කිහිපයක් පිළිබඳ දළ විශ්ලේෂණයක් සපයනු ඇත.

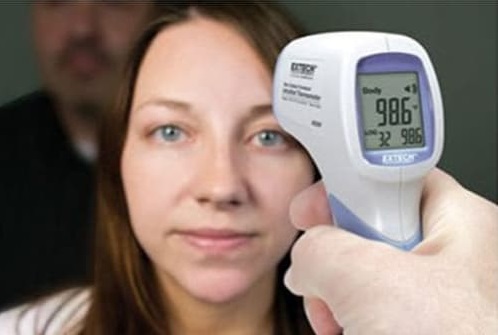
Single Person IR Thermometers ( තනි පුද්ගල IR උෂ්ණත්වමාන )

  • උපකරණය සහ පුද්ගලයා අතර 5 – 15cm අතර පරාසයක් තිබිය යුතුය.
  • වරකට මැනිය හැක්කේ එක් පුද්ගලයකුගේ පමණකි.
  • කුඩා ව්යාපාර සහ ගෘහස්ත භාවිතයට සුදුසුය.
  • රු .12800  ක් තරම් අඩු අගයකින් ආරම්භ වේ.

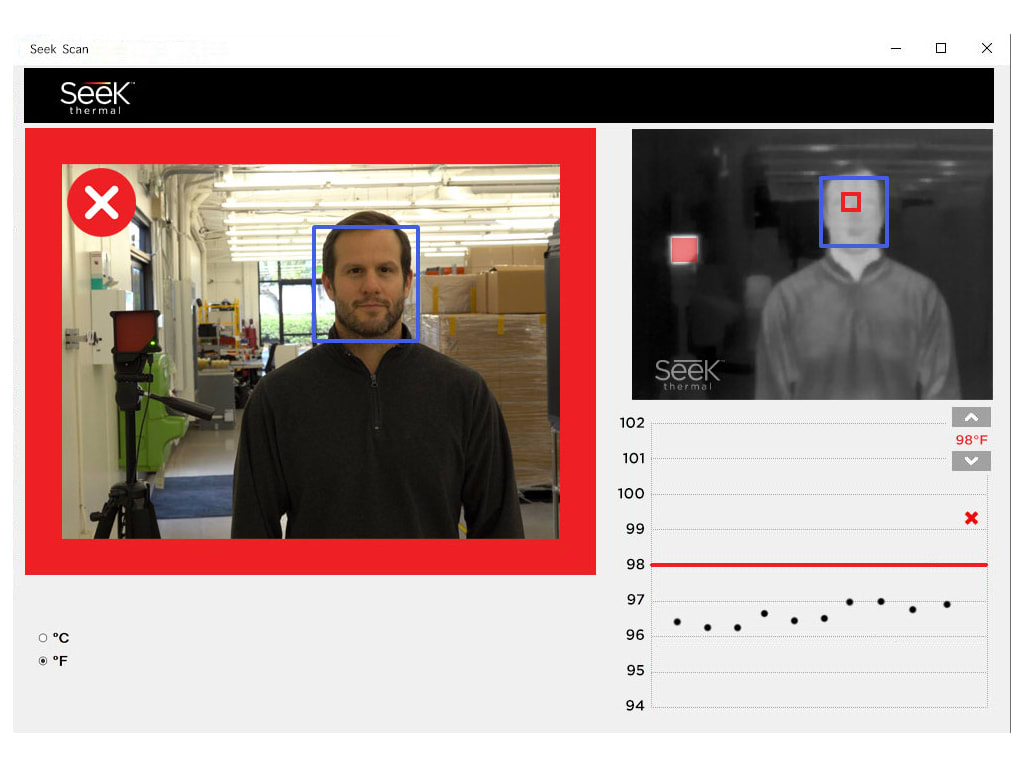
Single Person Thermal image solution

  • උපකරණය සහ පුද්ගලයා අතර 1 – 1.5 m අතර පරාසයක් තිබිය යුතුය.
  • වරකට මැනිය හැක්කේ එක් පුද්ගලයකුගේ පමණකි.
  • කුඩා සහ මධ්යම පරිමාණයේ  ව්යාපාර භාවිතයට සුදුසුය.
  • https://beachyspharmacy.com
  • රු .175000  ක් තරම් අගයකින් ආරම්භ වේ.

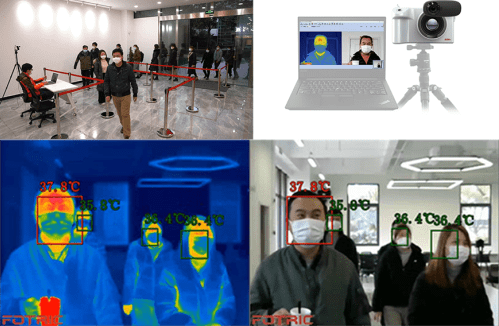
Group & Single Person Thermal solution

  • උපකරණය සහ පුද්ගලයා අතර 1 – 2 m අතර පරාසයක් තිබිය යුතුය.
  • කණ්ඩායමක් හෝ තනි පුද්ගලයන්  ගේ උෂ්ණත්වය මැනිය හැක.
  • මහා පරිමාණයේ  ව්යාපාර හෝ දුම්රිය ස්ථානය භාවිතයට සුදුසුය.
  • රු .1,250,000  ක් තරම් අගයකින් ආරම්භ වේ.

Raspberry Pi Accessories Selection Guide

 MODELS Raspberry Pi 4 Model B Raspberry Pi 3 Model B /
Raspberry Pi 3 Model B +
Raspberry Pi 3 Model A+ Raspberry Pi Zero /
Raspberry Pi Zero W
Price Range 8500-14000 8000-9000 5500-6500 2400-4000
Power Supply   Type C power Supply (5.1V 3A)

(Cannot use with older models )

Micro USB Micro USB Micro USB
Casing New Pi 4 Case
(Cannot use with older models )
Pi 3 Model B / B+ Case Pi 3 Model A+ Case Pi Zero Case
Video

HDMI Cable

Micro HDMI Cable

(This cable Cannot use with older models )

Standard HDMI Cable Standard HDMI Cable Mini HDMI Cable
Camera module Standard CSI (Camera Serial Interface) port Standard CSI (Camera Serial Interface) port Standard CSI (Camera Serial Interface) port Smaller CSI (Camera Serial Interface) porttransparentpharmacy.net

ආර්ඩුය්නෝ සොෆ්ට්වෙයා(ර්)  එක ඉන්ස්ටොල් කරගැනීම – Installing Arduino IDE

ආර්ඩුය්නෝ සොෆ්ට්වෙයා(ර්)  එක ඉන්ස්ටොල් කරගැනීම.

ආර්ඩුය්නෝ බෝඩ් එක ප්‍රෝග්‍රෑම් කිරීම සඳහා පළමුව ඔබ විසින් ආර්ඩුය්නෝ සොෆ්ට්වෙයා(ර්) එක ඉන්ස්ටොල් කරගත යුතුය.  ඔබට මීට අදාල ෆයිල් එක ආර්ඩුය්නෝ වෙබ්  අඩවියට පිවිසීමෙන් නොමිලේ ඩවුන්ලෝඩ් කරගත හැක. (https://www.arduino.cc/en/Main/Software)

ඔබගේ මෙහෙයුම් පද්ධතියට ගැලපෙන ෆයිල් එක තෝරා ඩවුන්ලෝඩ් කර ගන්න.  ඉන්පසුව පහත උපදෙස්  අනුගමනය කරන්න.

1.    ඉන්ස්ටොල්  කිරීමට Arduino.exe ෆයිල් එක මත ඩබල් ක්ලික් කරන්න.

2.      එවිට ආර්ඩුය්නෝ සොෆ්ට්වෙයා(ර්) එක ඉන්ස්ටොල් කිරීමට අවසර ඉල්ලා වී. අවසර ලබාදීමට YES බටන් එක මත ක්ලික් කරන්න.

3.      ඉන්පසුව ලයිසන් ඇග්රිමන්ට් එක මතුවේවි.  ඔබ එය සමඟ එකඟ නම්  I Agree බටන් එක මත ක්ලික් කරන්න.

4.      මීළඟට ඉන්ස්ටොල්  කිරීමට අවශ්‍ය සොෆ්ට් වෙයාර් ලැයිස්තුවක් පෙන්නුම් කරයි. මේ සියල්ලම නිරායාසයෙන් තේරී ඇති අතර එය ඒ ආකාරයටම තබා Next බටන් එක මත ක්ලික් කරන්න.

5.      ඉන්පසුව ආර්ඩුය්නෝ සොෆ්ට්වෙයා(ර්) එක ඉන්ස්ටොල්  වන ෆෝල්ඩර් එක පෙන්නුම් කරයි. ඔබට එය වෙනස් කිරීමට අවශ්‍ය නැත්නම් Install  බටන් එක මත ක්ලික් කරන්න.

6.      ඉන්පසුව සොෆ්ට්වෙයා(ර්) එක ඉන්ස්ටොල්  වන ප්‍රගතිය පෙන්නුම් කරයි.

7.      ෆයිල් එක ඉන්ස්ටොල් වී අවසානයේ ඩ්‍රවස් (Drivers) ඉන්ස්ටොල් කිරීමට අවසර ඉල්ලු විට Install  බටන් එක මත ක්ලික් කරන්න.


ඩ්‍රවස් සැකසීම – Configuring the Drivers : Windows

මේ වන විට ඔබ ආර්ඩුය්නෝ IDE එක ඉන්ස්ටොල්  කර අවසානයි. දැන් ඔබගේ ආර්ඩුය්නෝ බෝඩ් එක පරිගණකය ට USB කේබලය ආධාරයෙන් සම්බන්ධ කරන්න.  ආර්ඩුය්නෝ බෝඩ් එකේ PWR ලෙස මුද්‍රණය කර තිබෙන ස්ථානයේ ඇති කොලපාට LED බල්බය දැල්විය යුතුය. මීට අමතරව L ලෙස නම්කර තිබෙන LED බල්බය නිවි නිවී දැල්විය යුතුය.  මෙවිට වින්ඩෝස් හි Found New Hardwae Wizard ලෙස මතුවී වින්ඩෝස් මඟින්  නිරායාසයෙන් ගැලපෙන ඩ්‍රවස් තෝරා ගැනේ.

————————————————————————

  • ඔබට ඉහත පියවරේදී  කිසියම් වූ ගැටලුවක් පැන නැගුනහොත් වැඩි විස්තර සඳහා  “වින්ඩෝස් මෙහෙයුම් පද්ධතියෙ ආර්ඩුය්නෝ ඩ්‍රවස්  ඉන්ස්ටොල් කිරීමේදී පැන නගින ගැටලු”  ලිපිය බලන්න.

————————————————————————

දැන් ඔබ ඩ්‍රවස්  සකසා අවසානයි. ආර්ඩුය්නෝ බෝඩ් එක ප්‍රෝග්‍රෑම් කිරීම ට පෙර ඔබ නිවැරදි පොර්ට්  (Port) එක සැකසිය යුතුය.


පොර්ට් හඳුනාගැනීම – windows මෙහෙයුම් පද්ධතිය.

Desktop  සොට්කට්  එක හෝ  Start මෙනු එක භාවිතා කර ආර්ඩුය්නෝ IDE එක ඕපන් කරන්න.

ආර්ඩුය්නෝ IDE එකේ tools මෙනුවට යන්න. එහි Port මත ක්ලික් කරන්න.  එවිට ඔබ ට COM port එකක් හෝ වැඩි ගණනක් දැකගත හැකිය. එහි තිබෙන පොර්ට් අංක ලැයිස්තුව මතකයේ තබාගන්න.

දැන් ආර්ඩුය්නෝ බෝඩ් එක පරිගණකයෙන් වෙන් කරන්න. නැවතත් Port ලැයිස්තුව බලන්න. පෙර ලැයිස්තුවෙන් ආර්ඩුය්නෝ බෝඩ් එකට අදාල පොර්ට් අංකය  නව ලැයිස්තුවෙන් ඉවත් වී ඇත. සමහර විට මේ සඳහා ටික වේලාවක් ගතවේ. Port ලැයිස්තුව යාවත්කාලීන (Represh) කිරීමට Tools මෙනු එකෙන් ඉවත් වී නැවත Tools මෙනුවට යා යුතුය.

————————————————————————

  • ඔබට පොර්ට් අංකය හඳුනා ගැනීමේදී ගැටලුවක් ඇති වුවහොත් එය නිරාකරණය කර ගැනීම සඳහා  “වින්ඩෝස් මෙහෙයුම් පද්ධතියෙ පොර්ට් හඳුනා ගැනීමේදී පැන නගින ගැටලු”  ලිපිය බලන්න.

————————————————————————

ඔබ ආර්ඩුය්නෝ බෝඩ් එකට අදාල COM port එක සොයාගත් පසු නැවත ආර්ඩුය්නෝ බෝඩ් එක පරිගණකය සමඟ සම්බන්ධ කරන්න. ඉන්පසුව නැවතත් ආර්ඩුය්නෝ බෝඩ් එකට අදාල COM port එක තෝරන්න. ආර්ඩුය්නෝ IDE  –> Tools –> Port  –> COM port අංකය.

ඔබ ළඟ තිබෙන ආර්ඩුය්නෝ බෝඩ් වර්ගයට  අදාළව ආර්ඩුය්නෝ IDE  සොෆ්ට්වෙයා(ර්) එක සැකසී ඇත් දැයි අවසාන වශයෙන් පරික්ෂා කරබැලිය යුතුය.

ආර්ඩුය්නෝ IDE එකේ tools මෙනුවට යන්න එහි Board  එක මත ක්ලික් කරන්න. ඉන්පසු බෝඩ් ලැයිස්තුවෙන් ආර්ඩුය්නෝ ඌනො බෝඩ් එක තෝරාගන්න.  ආර්ඩුය්නෝ IDE  –> Tools  –> Board –> Arduino/Genuino Uno.  ඔබ ළඟ වෙනස් වූ වර්ගයේ බෝඩ් එකක් ඇත්නම් ඔබ එම බෝඩ් එක තෝරා ගත යුතුය. ( ඔබ ලඟ ඇති බෝඩ් එකේ නම බෝඩ් එක  පිටුපස ආර්ඩුය්නෝ  ලෝගෝ එක අසල මුද්‍රණය කර ඇත.)

සුභ පැතුම්!  ඔබ ආර්ඩුය්නෝ සොෆ්ට්වෙයා(ර්)  එක ඉන්ස්ටොල් කර, භාවිතයට ගත හැකි ලෙස සකසා අවසානයි.

LIMITED WARRANTY- RASPBERRY PI Orginal Product

Who is a “Customer” for purposes of this limited warranty?

If you have purchased a Raspberry pi directly from Microchip Solution, you are considered a “Customer” for purposes of coverage under this limited warranty.

Limited warranty: Microchip Solution warrants that the Raspberry pi will be free from defects in material or workmanship for a period mention in the Invoice from the date of purchase. In the event of a defect covered by this limited warranty, Microchip Solution will, at its option and free of charge to Customer, repair, replace or refund the purchase price paid.

MICROCHIP SOLUTION MAKES NO OTHER EXPRESS WARRANTIES EXCEPT AS PROVIDED HEREIN, AND ANY AND ALL IMPLIED WARRANTIES OF MERCHANTABILITY OR FITNESS FOR PARTICULAR PURPOSE SHALL ONLY BE IN EFFECT DURING  WARRANTY PERIOD PROVIDED HEREUNDER. MICROCHIP SOLUTION’S LIABILITY ON ANY WARRANTY CLAIM SHALL BE LIMITED TO THE ACTUAL PURCHASE PRICE PAID. MICROCHIP SOLUTION SHALL NOT BE RESPONSIBLE TO CUSTOMER OR ANY THIRD PARTY FOR ANY CONSEQUENTIAL, INCIDENTAL OR INDIRECT DAMAGES, INCLUDING BUT NOT LIMITED TO LOSS OF PROFITS, LOSS OF DATA, REVENUES, SALES, BUSINESS, GOODWILL OR USE.

What does this limited warranty NOT cover?

Microchip Solution has no obligation to repair, replace, or provide refunds in the following instances:

  •  If the alleged defect arises because Customer has used defect/wrong power supply or giving higher voltage to Raspberry Pi including GPIO pin
  •  If the alleged defect arises because Customer has altered or repaired the Raspberry pi without the prior written consent or authorization of Microchip Solution
  •  If Customer erased / Damaged to  Serial No
  •  If Customer did not follow any applicable instructions for proper storage, usage, or maintenance of the Raspberry pi
  •  If Customer has failed to notify Microchip Solution of any defect where the defect should have been reasonably apparent on inspection
  •  If Customer fails to notify Microchip Solution of the defect within Warranty period

This limited Warranty does not cover the cost of Delivery the defective Raspberry pi to Microchip Solution for repair, or the cost of shipping the repaired or http://www.gulfportpharmacy.com replacement Raspberry pi to you.

How do Customers receive warranty service?

Please call Microchip Solution customer service representative for details on how to raise an issue in relation to your Raspberry pi.

  1. Hand over the Raspberry Pi to our office along with original invoice
  2. Investigate by our technical staff
  3. Send back to manufacture for repair or replace.
  4. Receive back to our store.
  5. We will inform you to collect the product

Learn Arduino ආඩුඉනො සිංහලෙන් Part 2

Learn Arduino (ආඩුඉනො සිංහලෙන්) – Part 1

Get our Engineers support for your next project

Light Up Your Event With LEDs

Led star cloth, led curtain, wedding backdrop curtain

  • 10 x 20ft (3m X 6m) LED drape with motion graphics perfect for mobile DJs, bands, clubs and stage backdrops
  • Creates multiple animated patterns using 176 high-output, tri-color SMD LEDs and includes http://www.rustburgpharmacy.com the popular multicolored rain effect and simulated equalizer pattern with trigger effects in DMX or sound-activated mode

Call us today to reserve this item for your event!

(+94) 76 779 50 79